스프링 부트 REST API WEB 프로젝트
깃헙 링크
https://github.com/choiwoonsik/springboot_RestApi_App_Project/tree/main/restApiSpringBootApp
수행 목록
- 환경구성 및 helloworld 출력
- H2 DB 연동
- Swagger API 문서 연동
- REST API 설계
- RestControllerAdvice를 이용한 통합 예외 처리
- Entity - DTO 분리
- MessageSource를 이용해 예외 메시지 다국화
- JPA Aduting을 이용해 객체 생성시간/수정시간 적용
- 스프링 시큐리티 + Jwt를 이용해서 인증 및 권한 체크
- 스프링 시큐리티 AuthenticationEntryPoint, AccessDenied로 인증 및 인가 예외처리
- Jwt AccessToken + RefreshToken으로 보안성과 사용자 편의성 고도화하기
- JUnit Test (단위 테스트)
- JUnit Test (통합 테스트)
- OAuth 2.0 정리
- OAuth 2.0 카카오 로그인 part.1 Authorization code + Token 발급
- OAuth 2.0 카카오 로그인 part.2 토큰으로 회원 가입 / 로그인
- OAuth 2.0 카카오 로그인 테스트 검증
- 환경별 설정을 위해서profile 분리하기
예외처리
- Jwt 없이 API를 요청한 경우
- 형식에 맞지 않거나 or 만료된 Jwt를 사용한 경우
- 정상적인 Jwt를 사용하여 호출하였지만 권한이 없는 경우
위와 같은 상황이 발생한 경우에 직접 만든 CustemException이 발생하지 않고 아래와 같은 에러가 발생하게된다.

왜 그럴까?
커스텀 예외가 발생하지 않은 이유는 필터링의 순서에 있다. 지금까지 적용한 예외처리는 RestControllerAdvice를 통해 처리하게 했는데, 이 즉슨 예외가 Spring이 처리가능한 영역까지 도달한 경우 처리하도록 했다는 의미이다.
그러나, 스프링 시큐리티는 Servlet Dispatcher 앞단에 존재한다. 따라서 스프링이 제어할 수 없는 영역에서 발생하는 예외라는 것이다.
정상적으로 Jwt이 제대로 오지 않은 경우 - AuthenticationEntryPoiint
이 경우 토큰 인증 처리 자체가 불가능한 경우로 토큰을 검증하는 곳에서 프로세스가 끝나버리게 된다. 따라서 해당 예외를 잡아내기 위해서는 스프링 시큐리티가 제공하는 AuthenticationEntryPoiint를 상속받아서 재정의해야한다.
- 예외가 발생할 경우 "/exception/entryPoint"로 리다이렉트해서 처리
CustomAuthenticationEntryPoint 클래스 작성
@Component
public class CustomAuthenticationEntryPoint implements AuthenticationEntryPoint {
    @Override
    public void commence(
            HttpServletRequest request,
            HttpServletResponse response,
            AuthenticationException authException) throws IOException, ServletException {

        response.sendRedirect("/exception/entrypoint");
    }
}
예외가 발생한 경우 "/exception/entrypoint"으로 리다이렉트 한다.
Controller에서 해당 Exception URL로 온 요청을 처리하도록 하자.
ExceptionController
@RequiredArgsConstructor
@RestController
@RequestMapping("/exception")
public class ExceptionController {

    @GetMapping("/entrypoint")
    public CommonResult entrypointException() {
        throw new CAuthenticationEntrypointException();
    }
}
/exception/entrypoint로 리다이렉트 -> CAuthenticationEntryException()을 호출
CustomAuthenticationEntrypoint 클래스를 SecurityConfiguration에 추가해서 해당 에러 컨트롤을 도맡아서 할 수 있게 해주자.
SecurityConfiguration 클래스의 configure에 CustomAuthenticationEntrypoint클래스를 추가
    @Override
    protected void configure(HttpSecurity http) throws Exception {
        http
                .httpBasic().disable()
                .csrf().disable()
                .sessionManagement().sessionCreationPolicy(SessionCreationPolicy.STATELESS)
                .and()
                    .authorizeRequests()
                        .antMatchers("/*/login", "/*/signup").permitAll()
                        .antMatchers(HttpMethod.GET, "/exception/**").permitAll()
                        .anyRequest().hasRole("USER")
                .and()
                    .exceptionHandling().authenticationEntryPoint(new CustomAuthenticationEntryPoint())
                .and()
                    .addFilterBefore(new JwtAuthenticationFilter(jwtProvider), UsernamePasswordAuthenticationFilter.class);
    }
에러가 발생하면
-> CustomAuthenticationEntryPoint 클래스를 호출
-> /exception/entryPoint로 리다이렉트
-> ExceptionController에서 해당 URL 처리, CAuthenticationEntryException()가 호출 된다.
예외처리를 할 CAuthenticationEntryException()를 RestControllerAdvice()에 추가한다.
커스텀 예외 클래스 : CAuthenticationEntryPointException
package com.restApi.restApiSpringBootApp.advice.exception;

public class CAuthenticationEntryPointException extends RuntimeException {
    public CAuthenticationEntryPointException() {
        super();
    }

    public CAuthenticationEntryPointException(String message) {
        super(message);
    }

    public CAuthenticationEntryPointException(String message, Throwable cause) {
        super(message, cause);
    }
}
RestControllerAdvice에 해당 예외처리 메소드 추가
    /**
     * 전달한 Jwt 이 정상적이지 않은 경우 발생 시키는 예외
     */
    @ExceptionHandler(CAuthenticationEntryPointException.class)
    @ResponseStatus(HttpStatus.INTERNAL_SERVER_ERROR)
    protected CommonResult authenticationEntrypointException(HttpServletRequest request, CAuthenticationEntryPointException e) {
        return responseService.getFailResult(
                Integer.parseInt(getMessage("authenticationEntrypoint.code")), getMessage("authenticationEntrypoint.msg")
        );
    }
예외 출력 구문 추가
authenticationEntrypoint:
  code: "-1003"
  msg: "You do not have permission to access that resource."
---
authenticationEntrypoint:
  code: "-1003"
  msg: "해당 리소스에 접근하기 위한 권한이 없습니다."
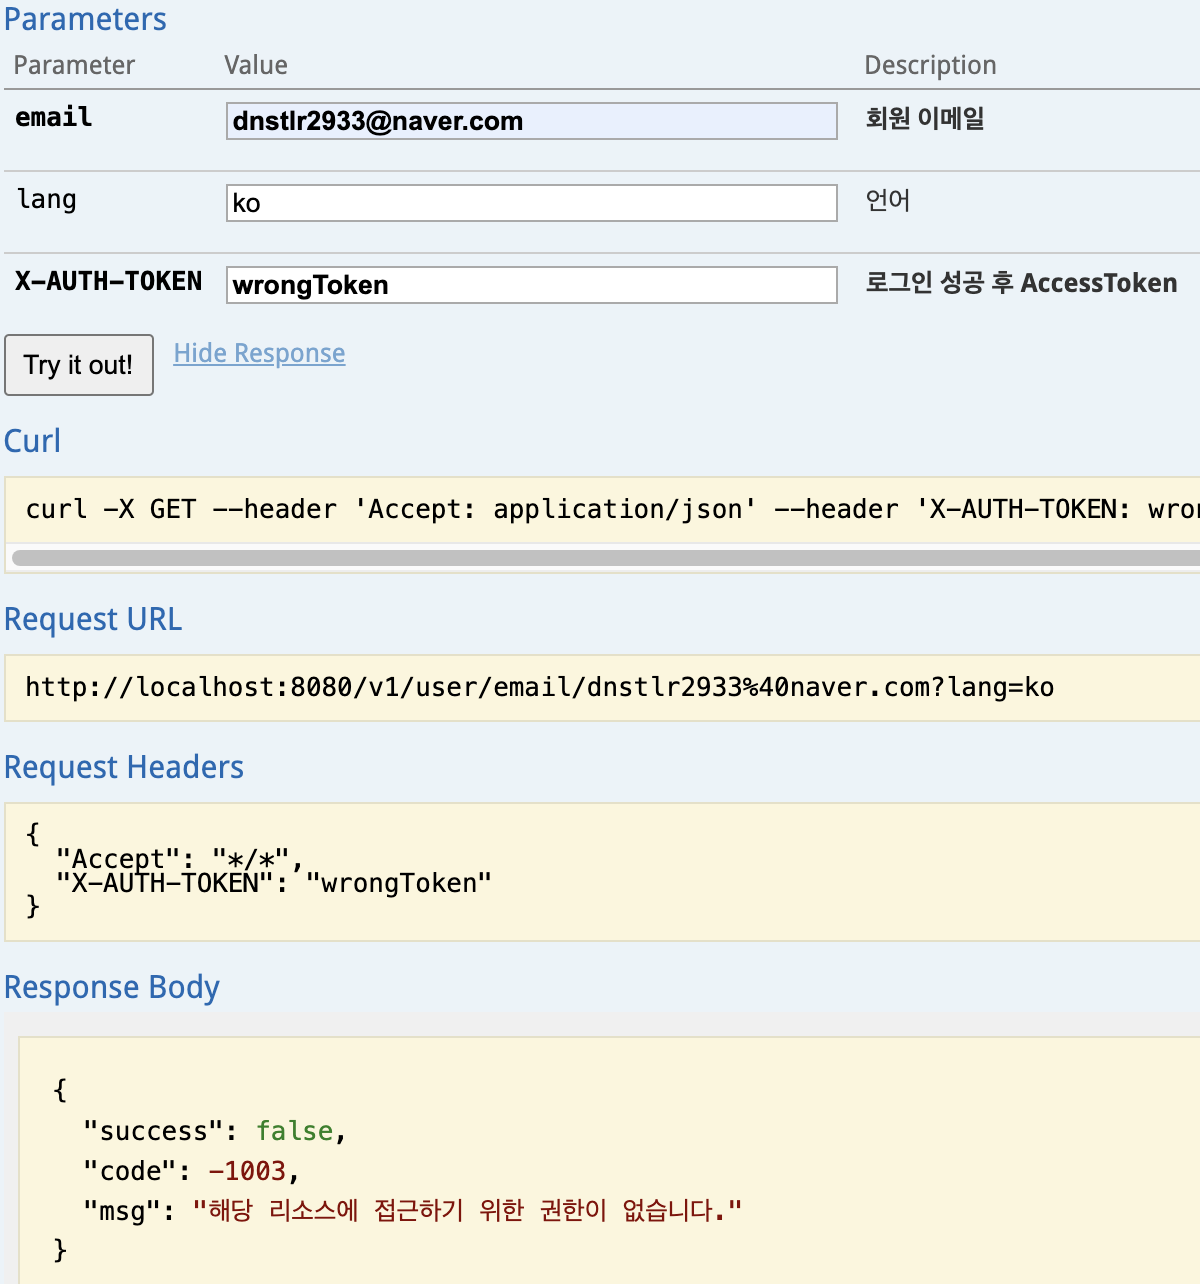
Swagger API 테스트

잘못된 토큰이 전달되면 그에 맞는 예외처리가 수행되고 있다.
정상적인 Jwt이 왔지만 권한이 다른 경우 - AccessDeniedHandler
Jwt는 정상적인 경우지만 권한이 부족한 경우로 스프링 시큐리티의 AccessDeniedHandler를 상속받아서 재정의해야한다.
- 예외가 발생할 경우 "/exception/accessDenied"로 리다이렉트해서 처리
- 위에서 작성한 AuthenticationEntryPoint를 처리한 방법과 유사하다
CustomAccessDeniedHandler 클래스 작성
@Component
public class CustomAccessDeniedHandler implements AccessDeniedHandler {

    @Override
    public void handle(
            HttpServletRequest request,
            HttpServletResponse response,
            AccessDeniedException accessDeniedException) throws IOException, ServletException {

        response.sendRedirect("/exception/accessDenied");
    }
}
"/exception/accessDenied"로 리다이렉트
해당 URL을 처리하기 위해 ExceptionController 수정
ExceptionController에 아래 내용을 추가
    @GetMapping("/accessDenied")
    public CommonResult accessDeniedException() {
        throw new AccessDeniedException("");
}- 발생시킬 예외 : AccessDeniedException("")를 던지게 한다
- 이미 존재하는 예외이므로 바로 사용하면 된다.
RestControllerAdvice에 AccessDeniedException 핸들러를 추가
     /**
     * 권한이 없는 리소스를 요청한 경우 발생 시키는 예외
     */
    @ExceptionHandler(AccessDeniedException.class)
    @ResponseStatus(HttpStatus.INTERNAL_SERVER_ERROR)
    protected CommonResult accessDeniedException(HttpServletRequest request, AccessDeniedException e) {
        return responseService.getFailResult(
                Integer.parseInt(getMessage("accessDenied.code")), getMessage("accessDenied.msg")
        );
    }
예외 출력 메시지 & 코드 추가
accessDenied:
  code: "-1004"
  msg: "Permission not accessible to this resource."
완성한 CustomAccessDeniedHandler를 SecurityConfiguration에 추가하자
SecurityConfiguration에 추가
    @Override
    protected void configure(HttpSecurity http) throws Exception {
        http
                .httpBasic().disable()
                .csrf().disable()
                .sessionManagement().sessionCreationPolicy(SessionCreationPolicy.STATELESS)
                .and()
                    .authorizeRequests()
                        .antMatchers("/*/login", "/*/signup").permitAll()
                        .antMatchers(HttpMethod.GET, "/exception/**").permitAll()
                        .anyRequest().hasRole("USER")
                .and()
                    .exceptionHandling().authenticationEntryPoint(new CustomAuthenticationEntryPoint())
                .and()
                    .exceptionHandling().accessDeniedHandler(new CustomAccessDeniedHandler())
                .and()
                    .addFilterBefore(new JwtAuthenticationFilter(jwtProvider), UsernamePasswordAuthenticationFilter.class);
    }
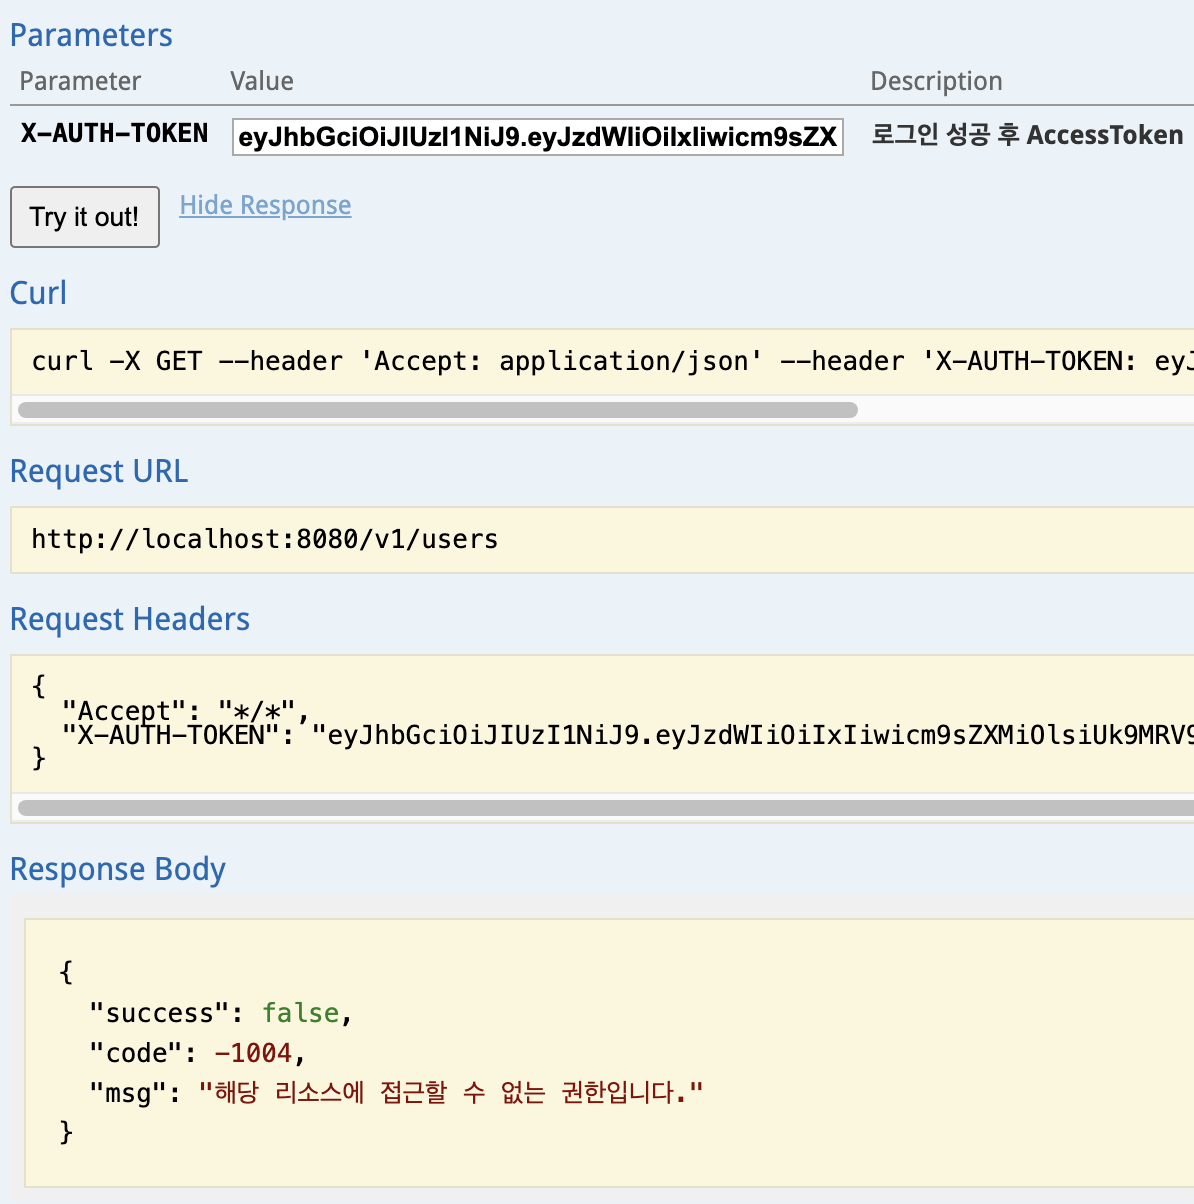
Swagger API 테스트
테스트를 위해서 모든 유저 조회는 ADMIN 권한이 필요하다고 수정


권한이 부족하다고 뜨는것을 확인할 수 있다.
@애노테이션으로 리소스 접근 권한 설정하기
현재는 리소스에 대한 접근관리를 SecurityConfiguration을 통해 코드로 hasRole("ROLE")검사를 지정한 URL마다 확인하게 하고 있다. 이를 메소드마다 @애노테이션으로 관리할 수도 있다.
SecurityConfiguration 파일로 관리하면 한곳에서 모든 접근권한을 관리할 수 있다는 장점이 있고, 애노테이션으로 설정시 메소드를 통해 접근 권한을 바로 파악할 수 있다는 장점이 있다. 적절히 사용하도록 하자.
@PreAuthorize, @Secured
권한 설정이 필요한 리소스에 해당 애노테이션을 통해 필요 권한을 설정해 줄 수 있다.
먼저 SecurityConfiguration을 수정해야한다.
@EnableGlobalMethodSecurity(prePostEnabled = true, securedEnabled = true)SecurityConfiguration 클래스 위에 @EnableGlobalMethodSecurity를 달아준다. PrePost, secureed를 활성화시켜준다.
@Override
    protected void configure(HttpSecurity http) throws Exception {
        http
                .httpBasic().disable()
                .csrf().disable()
                .sessionManagement().sessionCreationPolicy(SessionCreationPolicy.STATELESS)
//                .and()
//                    .authorizeRequests()
//                        .antMatchers("/*/login", "/*/signup").permitAll()
//                        .antMatchers(HttpMethod.GET, "/exception/**").permitAll()
//                        .anyRequest().hasRole("USER")
                .and()
                    .exceptionHandling().authenticationEntryPoint(new CustomAuthenticationEntryPoint())
                .and()
                    .exceptionHandling().accessDeniedHandler(new CustomAccessDeniedHandler())
                .and()
                    .addFilterBefore(new JwtAuthenticationFilter(jwtProvider), UsernamePasswordAuthenticationFilter.class);
    }
authorizeRequests()를 비활성화 시켜준다
@PreAuthorize 사용
- 정규식 사용가능
- 자동완성 지원 및 컴파일 에러를 잡아준다
-
@PreAuthorize("hasRole('ROLE_PLATINUM') and hasRole('ROLE_GOLD')")
@Secured 사용
- 정규식 사용 불가능
-
@Secured({"ROLE_PLATINUM", "ROLE_GOLD"})
정보
만약 특정 Controller 전체를 특정 권한으로 설정하고 싶다면 컨트롤러 위에 애노테이션을 달아주면 된다.
@애노테이션이 달리지 않은 모든 메소드는 누구나 접근 가능한 리소스가 된다
애노테이션으로 권한 설정한 모습
@PreAuthorize("hasRole('ROLE_USER') and hasAnyRole('ROLE_IORN', 'ROLE_SILVER', 'ROLE_GOLD', 'ROLE_BRONZE')")
@Api(tags = {"2. User"})
@RequiredArgsConstructor
@RestController
@RequestMapping("/v1")
public class UserController {

    private final UserService userService;
    private final ResponseService responseService;

    @PreAuthorize("hasRole('ROLE_PLATINUM') and hasRole('ROLE_GOLD')")
    @ApiImplicitParams({
            @ApiImplicitParam(
                    name = "X-AUTH-TOKEN",
                    value = "로그인 성공 후 AccessToken",
                    required = true, dataType = "String", paramType = "header")
    })
    @ApiOperation(value = "회원 단건 검색", notes = "userId로 회원을 조회합니다.")
    @GetMapping("/user/id/{userId}")
    public SingleResult<UserResponseDto> findUserById
            (@ApiParam(value = "회원 ID", required = true) @PathVariable Long userId,
             @ApiParam(value = "언어", defaultValue = "ko") @RequestParam String lang) {
        return responseService.getSingleResult(userService.findById(userId));
    }
}
AthenticationEntryPoint, AccessDeniedHandler를 이용해서 인증 및 접근 권한을 확인하는 보안을 완성했다. 또한 애노테이션(@PreAuthorize, @Secured)를 이용해서 설정하는 방법도 알아 보았다. 스프링 시큐리티의 내용이 정말 많지만 또 필수적인 것들이라 더 많은 공부가 필요하다.